
27.04.2007
THE EXPERT`S CHOICE: E.GLEIZEROV COMMENTS ON THE GAME MOTYLEV-LUTZ
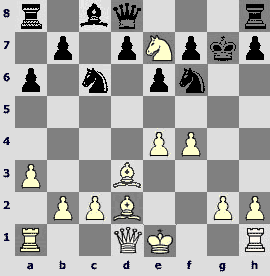
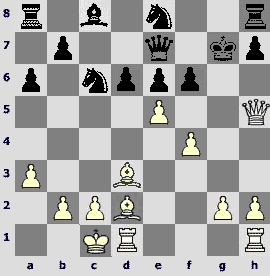
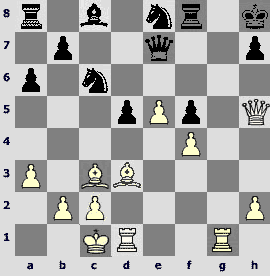
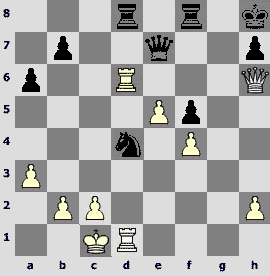
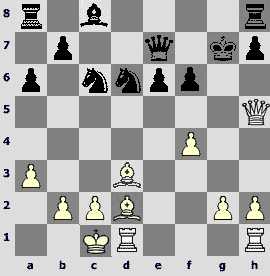
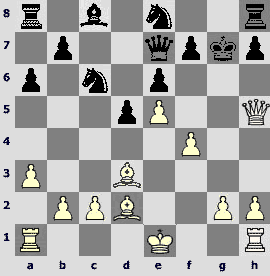
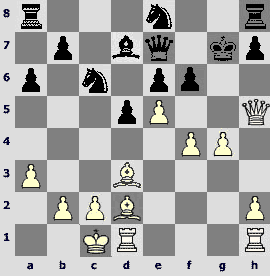
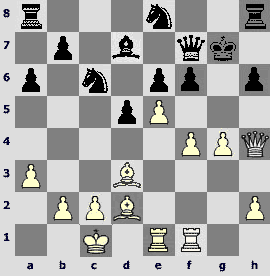
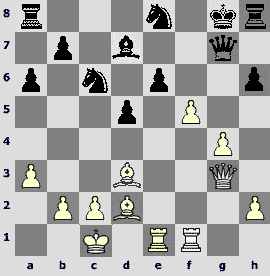
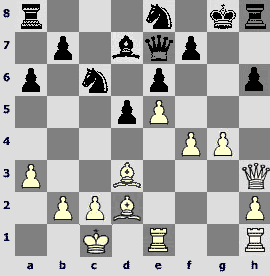
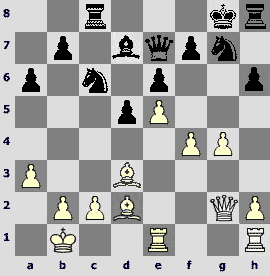
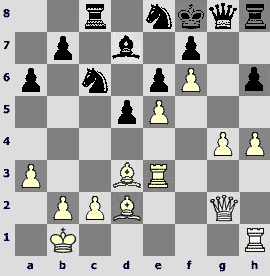
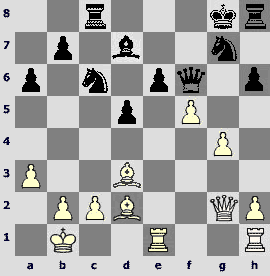
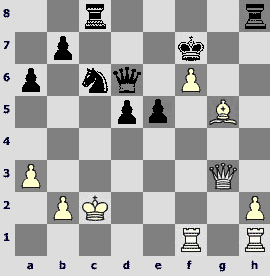
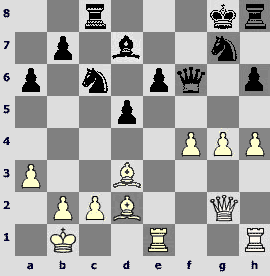
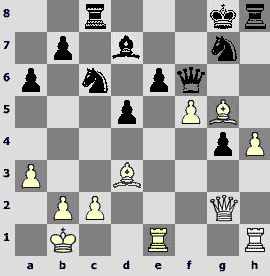
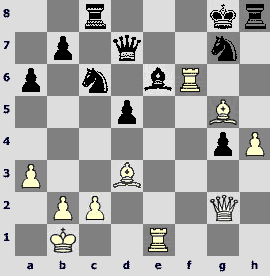
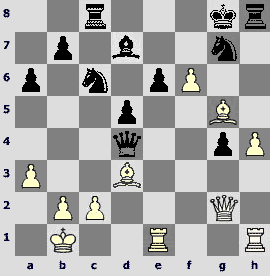
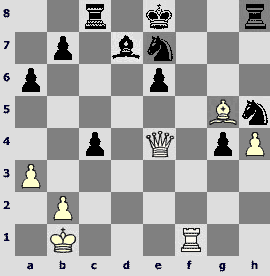
A. Motylev – C. Lutz B46 Grandmaster Alexander Motylev is endowed with this amazing "Alekhine-like" sense of initiative – a gift both rare and precious for a chessplayer. And everybody knows that Sasha is not short on sporting fearlessness. This combination is something that gives rise to masterpieces. I'd like to notice that Alexander's opponent in this brilliant game was Christopher Lutz, an experienced, strong and hard- to - defeat Grandmaster, and he had put up a good show, defending himself stubbornly and resourcefully, too. Well, the real chess beauty arises only in "joint authorship" with such opponents. 1.e4 c5 2.¤f3 e6 3.d4 cxd4 4.¤xd4 ¤c6 5.¤c3 a6!? Christopher is a "Sicilian addict" who used to choose many a different path in his favorite opening. But although Paulsen Systemis a frequent visitor in his games he plays this particular variation almost for the first time. The word "almost" appears here due to the fact that Lutz did play this way against Radjabov during the 2005 European championship. The saying about spoiling before you spin has proved right then, but here is another try after one and a half years. 6.Ґe3!? And here is a surprise in return! As a rule in this position Motylev captures on c6, but now he decides to follow in Radjabov's footsteps, which completely changes the game's nature. Only five and a half moves that have been known for ages and ages are made, and the intrigue is already here! 6...¤f6 7.f4 Ґb4 8.Ґd3 Јb6!? So that's what Christopher meant... Against Radjabov he had chosen a calm move 8...d6 and was literally routed after 9.¤xc6 bxc6 10.O–O c5?! 11.e5! Though later Svidler in his game against the very same Radjabov had strengthened the play – 10...e5! – and managed to achieve equality, but Lutz, apparently not wishing to test the quality of his opponents' home preparation, is first to turn aside. The ambitious move in the text has almost never occurred in the GM practice. Black plan entirely based on tactical peculiarities of a position becomes clear, for example, from the game Khalifman – Rublevsky from 2005 Russian championship superfinal: 9.O–O Ґc5! (but not 9...¤xd4?, after which both 10.¤a4 Јc6 11.c3 and 10.e5! ¤d5 11.¤xd5 exd5 12.c3 Ґc5 13.cxd4 Ґxd4 14.Ґxd4 Јxd4+ 15.¦f2 lead to a great white advantage) 10.¤a4 Ґxd4 11.¤xb6 Ґxe3+ 12.ўh1 Ґxb6 13.e5 ¤d5 14.Јe1, and in this complex unclear position with unconventional alignment of forces the opponents agreed to a draw. Everything seems OK for Black after self-suggesting 9.¤f5 Јa5! as well, because after 10.¤xg7+ ўf8 the knight that has lost contact with its army cannot be saved, and was there any need to make all that fuss for the miserable retreat to g3? In the whole all this looks very much "computer-like". And you can easily guess that our iron "sworn friend" is highly positive in his estimation of this provocative (under X-ray attack!) queen lunge. 9.¤f5! Nevertheless! So what's on White's mind? 9...Јa5 10.¤xg7+! ўf8 11.Ґd2!! Ah, here it goes! Of course, capturing a second pawn would be naïve, not to say silly: 11.¤xe6+? dxe6, and White is back to square one. And now Black has to part with his most important dark-squared bishop. 11...ўxg7. The gallant steed perishes, but this is death of a hero. 12.a3 Ґe7. There is no choice. After a retreat to d6 or с5 the bishop gets under a pawn fork. 12...Ґxc3?? is also losing outright: 13.Ґxc3 Јd8 14.Јg4+ ўf8 15.Јg5. Finally, after 12...Ґf8? 13.¤d5 Јd8 14.Ґc3! Black still has to lose the most important tempo and play 14...Ґe7 and15.¤xe7 Јxe7 16.Јg4+ ўf8 17.Јg5 e5 18.fxe5 ¤g8 (18...¤e8 19.Јh6+ ўg8 20.O–O) 19.Јh5 leads to a picturesque position where Black is absolutely helpless. 13.¤d5 Јd8 14.¤xe7. Forced play is over, now it's time to catch our breath and see what we have there. White has only one little pawnlet for a sacrificed piece – and no concrete threats at all. No wonder that puter is absolutely sure of Black's significant advantage. Running a bit ahead I should say that the confuser would start having some doubts in only about 12 moves, when everything is by and large decided. Well, it's good to see that some things in chess are still beyond computer's comprehension. But never mind the machine; let's look at the position with a human eye. I'll be honest with you – I'm not sure at all! Oh yeah, White has two powerful bishops and a great lead in development. Oh yeah, black king lacks protection, the dark squares in his camp are weak, and mobility of his pieces is rather restricted. This is so, but White is a PIECE DOWN! That is no laughing matter! Naturally we would like the spirit to triumph over the inert matter and a brilliant sacrifice to be proved correct. But let's not get emotional and try to sort it all out calmly and as objectively as possible. As they say, the postmortem will tell everything... The position shown on the diagram is the first and possibly most important crucial point after the knight sacrifice. Black faces a difficult choice –with which piece to capture? 14...Јxe7. The most natural decision. I would have played so myself, and with no particular hangups about it at that. Indeed, it seems that after taking with king the black long diagonal becomes entirely weak. And then, why decentralize the knight? But in the light of the following events all this does not look so obvious. Later on we will see that the c6-bishop will remain an indifferent witness of its own king's execution. And it could have been so useful somewhere on g6! That's why it is necessary to examine 14...¤xe7!? as seriously as possible, the more so because the obvious 15.Ґc3? turns out a shot into the air in view of15...d5! Black spring unwinds with great effect, as now after the check from g4 Black can block that check with his knight! The meaning of this is that White has the only move 15.e5. The f6-knight has three squares to retreat to, but only one of them is worth serious consideration. 15...¤fd5 16.c4 ¤c7 can be safely rejected for general reasons: the c7-knight is not simply out of work, in blocks the way out for its own queen in addition. One way or another it has to be transferred to e8 – so why lose tempi in vain? Still worse is 16...¤b6– after 17.Ґe3! the ill-fated knight is in totally desperate straits. As for the seemingly ridiculous move 15...¤fg8it remains the same on closer inspection:16.Јh5! (premature is 16.f5?! exf5! 17.Јh5 ¤g6 18.O–O d6) 16...¤g6 (or 16...¤h6 17.g4!±) 17.O–O–O ¤8e7 (17...Јh4 18.Јf3 is of no use) 18.f5!, and, having posted the bishop on f6 White achieves complete domination. OK, OK, but what to do after the natural and, of course, the strongest move 15...¤e8? The first thing that comes to mind is 16.f5!?, the more so because there is no capture with the knight – 16...¤xf5? 17.Јg4+ ўf8 18.Ґxf5 exf5 19.Ґh6+ ўe7 20.Ґg5+ f6™ (20...ўf8 21.Јb4+ќ) 21.exf6+ ¤xf6 22.Јxf5, and mate is not far off. But after 16...exf5! 17.Јh5 Јb6! it is not easy for White to attack at all – the bishop pair saves their sovereign all the time, and then the black queen joins in the defense with great effect along the now opened 6th rank, for example: 18.Јg5+ (18.Ґc4 Јg6 19.Ґh6+ ўg8 20.Јh4 d5!) 18...¤g6 19.Јh6+ (19.Ґc3 d5 20.exd6+ f6) 19...ўg8 20.O–O–OЈe6 21.¦de1 b5 22.¦hf1 f4, and white initiative gradually comes to naught. Much more dangerous for Black is the move 16.Јh5! Now f4-f5 becomes a terrible threat. This can be is easily proved by making some abstract, "generally developing" move for Black, for instance, 16...b5. And why not? The bishop needs developing after all! But, as they used to say in my distant youth, "developing is good for children": 17.f5! ¤xf5 (there is no choice, 17...exf5? is already losing: 18.Ґh6+ ўg8 19.Јg5+ќ) 18.Јg4+ ўf8 19.Ґxf5 exf5 20.Ґh6+ ўe7 21.Јg5+ f6 22.exf6+ ¤xf6 23.O–O! (but not 23.O–O–O?! ¦g8!), and I don't envy the black king. And after 16...d5 the breakthrough 17.f5! allows White to carry out a decisive attack, as Black would not be able to play because of 17...¤xf5 из-за 18.Јg4+ ўf8 19.Ґxf5 exf5 20.Ґb4+. 16...d6 is "no remedy" as well. Now the a3-f8 diagonal is covered, but it doesn't do Black any good: 17.f5! ¤xf5 18.Ґxf5 exf5 19.Ґh6+ ўg8 20.O–O–O! (with a terrible threat of 21.¦d3!) 20...¤g7™ 21.Ґxg7 ўxg7 22.¦xd6 Јe7 23.Јh6+ ўg8 24.¦f1! and there is no adequate defense from the mating maneuver ¦f3-g3. And what if to try and undermine white center from the other side: 16...f6? You will laugh but 17.f5! is also a very strong move here as Black cannot take on f5: 17...exf5 18.Ґh6+ ўg8 19.Ґc4+ќ; 17...¤xf5 18.g4!ќ. 16...f5, in hope to hinder the terrible breakthrough for good, is useless as well. Trouble comes from the other side: 17.g4!, and the g-file is opened up with a decisive effect: 17...¦g8 (or 17...d5 18.exd6 ¤d5 19.gxf5 Јxd6 20.O–O–Oќ) 18.gxf5 ¤xf5 19.Ґxf5 exf5 20.¦g1+ ўh8 21.¦xg8+ ўxg8 22.O–O–O ¤g7 23.¦g1 ўh8 24.Јf7 Јg8 25.Јf6ќ. But, of course, nothing is lost for Black yet. Simple 16...¤g6, threatening with the exchange of queens, allows him to win a tempo that is most important for defense. Now there is a very tempting-looking move17.f5!? White pretends to overlook the exchange. But it's not a blunder but a trap! After the reflectory 17...Јh4+?! 18.Јxh4 ¤xh4 19.f6+ ўg8 20.O–O–O it turns out that White, being a piece down in an endgame, nevertheless has excellent prospects in it, as Black practically plays without the h8-rook, and all the rest black pieces are posted far from ideally, to put it mildly. But, alas, the tough reply 17...exf5!casts serious doubts on the white plan. So he's better just castle: 17.O–O–O, after which the forced variations are over and there arises a highly complex and hard-to-estimate position. I personally think that White retains fine opportunities of developing his initiative, for instance: 17...f5 18.exf6+ ¤xf6 19.Ґc3 d5 20.Ґd4 or 17...ўg8 18.Јf3 ¤g7 19.Ґb4.But then black defensive recourses should by no means be underestimated. Well, let's sum it up for the time being. Yes, capturing with the knight is really worth attention, but it cannot serve as a refutation of Motylev's idea. White retains the compensation for his piece even in this case. But in order to decide which mark to use with this move – !? or ! - we should at first sort out the consequences of taking with the queen that has been chosen by Lutz. That's just what we are going to do right now, of course. 15.e5 ¤e8. All we have said about the retreat to d5 remains true here as well. Just a bit of illustrating: 15...¤d5 16.c4 ¤c7 (16...¤b6? 17.Ґe3ќ) 17.Јh5 b5 (can you suggest anything else?) 18.f5! ¤xe5 (there is no escape as well in 18...exf5 19.O–O ¤xe5 20.¦xf5 with irrefutable attack) 19.Јh6+ ўg8 20.Ґb4!! ¤xd3+ 21.ўe2! (21.ўf1 ¤xb4 22.f6 Јxf6+ 23.Јxf6 ¤c6 is worse) 21...¤f4+™ (now 21...¤xb4 is already losing: 22.f6! Јxf6 23.Јxf6 ¤c6 24.¦hf1ќ) 22.Јxf4 Јf6 23.Ґc3 Јxf5 24.Јxc7 Јe4+ 25.ўf2 Ґb7 (25...Јf5+ 26.ўg1ќ) 26.Јg3+, and White forces the transposition into endgame in which he has every chance to win. 16.Јh5! Alexander finishes development as if nothing has happened. Fussy 16.Јg4+ ўf8 17.f5? is, of course, an exercise in futility: after 17...h5 White is in trouble. 16...d5. Black also has to think about developing his pieces, but is Lutz right in his desire to close up the center? What if he tries to undermine the key white pawn outpost: 16...d6 17.O–O–O f6? First let us check 18.Ґc3 forcing the opponent to play 18...d5 still (bad is 18...ўg8 19.exf6 ¤xf6 20.Јh4 ўf7 21.g4!, and white offensive seems hardly stoppable). And then the white rooks join in the attack: 19.¦hf1! f5. Forced! The threat of f4-f5 is very dangerous, for instance: 19...Ґd7 20.f5! ¤xe5™ (20...exf5 21.Ґxf5 d4 22.exf6+ ¤xf6 23.Јg5+ ўf7 24.¦de1ќ; 20...d4 21.exf6+ ¤xf6 22.Јg5+ ўf7 23.fxe6+ Ґxe6 24.Ґe2!ќ) 21.Ґxe5 fxe5 22.f6+! ¤xf6 23.Јg5+ ўf7. And now there follows not faint-hearted 24.¦xf6+? Јxf6 25.¦f1 Јxf1+ 26.Ґxf1, and white advantage is minimal, but deadly cold 24.Јxe5!, and I can see no adequate defense against doubling the rooks along the f-file and the g-pawn advance. 20.g4. The g-file gets opened up; Black has to hide his king in a hurry. His choice is not wide. At first let's examine the self-suggesting 20...Јf7 21.Јh4! (of no use is the tempting 21.Јxf7+?! ўxf7 22.gxf5 d4! 23.fxe6+ Ґxe6 24.Ґd2 Ґh3!, and then ¤g7 blocking the pawns) 21... d4 (it won't do to go on "pestering" the white queen any more: 21...Јe7? 22.Јxe7+ ¤xe7 23.gxf5 exf5 24.e6+ ¤f6 25.¦g1+ ¤g6 26.Ґxf5, and Black might as well resign) 22.gxf5! (The only move! After the sluggish 22.Ґd2?! h6! Black is absolutely comfortable) 22...exf5 (of course, the knight is untouchable: 22...dxc3 23.¦g1+ ўf8 24.Јh6+ќ) 23.¦g1+ ўf8 24.Јh6+ ўe7™ (24...¤g7 25.Ґc4ќ) 25.Ґxd4!! White is not at all happy with perpetual check from g5 and h6-squares! 25...¤xd4 26.Јb6! ¤e6 (there is nothing better than this) 27.Јb4+ ўd8 28.Ґb5+ ўc7 29.Ґxe8 Јf8 30.Јd6+! Јxd6 31.exd6+ ўd8 32.d7 ¦xe8 33.dxe8Ј+ ўxe8 34.¦g8+, and a rook in this position is clearly stronger than a bishop and a knight. And now let's look into another possibility: 20...¦f8! That's another cup of tea now! On h8 the black monarch is not exactly out of danger, but he can take a breath still. 21.gxf5 exf5 22.¦g1+ ўh8. In this most interesting position normal "human" play will hardly, in all probability, carry you forward: 23.Ґe1 (the long diagonal can always be intercepted by way of d5-d4, so the bishop aims at the f6-square) 23...Ґe6 24.Ґh4 Јf7 25.Јh6. There is a threat of a deadly doubling the rooks along the g-file, but... 25...¤e7!, and Black has every chance to gradually neutralize the opponent's threats retaining the extra material at that. And here the Great and Terrible Machine comes to the rescue, putting out a whole lot of most brilliant variations: 23.Ґc4!! When your opponent makes such a move, you are liable to fall from your chair! But if you still managed to keep your seat then it is quite easy to weigh up the variation 23...dxc4 24.Јxe8! Ґe6™ 25.Јxe7 ¤xe7 26.¦d6. As it usually happens, the brilliant combination ends in a prosaic endgame. A piece has to be given back, White keeps his extra pawn and some good chances to win with it. All this is very nice, but, you know, capture is not obligatory in chess. Why not "pull the plug" on this dreadful c3-bishop by way of 23...d4? In the endgame arising after 24.Ґe1 Ґe6 25.Ґh4 Јf7 26.Јxf7 Ґxf7 27.e6 Ґg6 28.e7 ¦f6 29.Ґxf6+ ¤xf6 White is the only one who can have problems, isn't he? The concrete 24.¦xd4!? looks dangerous, but here after the forced 24...¤xd4™ (24...Ґe6 25.¦d6! Ґxc4 26.e6+ ¤f6 27.¦d7ќ) 25.Ґb4 Јc7™ 26.Јh6!™ (26.Ґxf8?? Јxc4°) 26...¤e2+ 27.ўb1 ¤g7™ 28.Ґd6 (28.Ґxf8? ¤xg1 29.Јf6 Ґe6!) 28...¤xg1!™ (28...Јd7? 29.Ґxf8 ¤xg1 30.Јf6ќ) 29.Ґxc7 ¤f3! Black shouldn't lose as well, although he will have to cede his extra exchange. But, having done a double-take, we will discover that by safely intercepting the diagonal for the dark-squared bishop Black at the same time has opened the doors wide for its light-squared fellow. After that the correct solution is quite easy to find – 24.¦g6! White intends to double his rooks along the g-file and to mate on g8. And in order to deprive his opponent of the possibility to play Ґe6 the rook moves exactly to the 6th rank. An easy analysis shows that Black has no adequate defense: 24...dxc3 (24...¤g7 25.¦dg1 ¤e6 26.Јh6 ¤cd8 27.Ґb4ќ; 24...¤c7 25.Јh6!ќ; 24...b5 25.Ґd5) 25.¦dg1 cxb2+ 26.ўxb2 Ґe6™ (26...¤g7 27.Јh6 ¤a5 28.Ґa2 ¤e6, and then not the hasty 29.Ґxe6? Ґxe6 30.¦g7 ¤c4+ but the prophylactic 29.¦1g3!!, and the deadly threat of 30.Ґxe6 cannot be parried) 27.Ґxe6 (27.¦xe6?? ¤g7°) 27... ¤c7™ 28.¦g7 Јxg7 29. ¦xg7 ўxg7 30.Ґxf5 ¦xf5 (all the rest is still worse) 31.Јg4!+ ўh8 32.Јxf5. And in this forcedly arising after 24.¦g6! position a queen with two connected passed pawns are much stronger than a rook and two knights. It looks like Black has to hold both diagonals – a1-h8 and a2-g8 at once. And to do that is not so difficult at all – 23...Ґe6. As it usually happens, a simple and natural move turns out to be the strongest. But there is still much interesting to follow! Well, for example, that's how White can elegantly obtain an advantage after 24.Ґxd5 ¦d8. 25.Јh6!! ¤c7 (25...¦xd5 26.¦xd5 Ґxd5 27.e6+ ¤f6 28.¦g6ќ; 25...Ґxd5 26.e6+ ¤f6 27.¦g6ќ) 26.Ґe1!! ¦f7™ (26...¦xd5 27.Ґh4 ¦xd1+ 28.ўxd1ќ) 27.Ґh4 Јf8™ 28.Ґxe6 Јxh6 (28...¦xd1+ 29.ўxd1 Јxh6 30.Ґxf7ќ) 29.¦xd8+ (29.Ґxf7?? Јxf4+°) 29...¤xd8 30.Ґxf7 ¤xf7 (30...Јxf4+?? 31.ўb1ќ) 31.Ґf6+ Јxf6 32.exf6 ¤e8 33.¦e1 ¤xf6 34.¦e7 ¤d6 35.b3!, and White obviously stands better (although Black still has some kind of counterplay due to the f4-pawn weakness). Alright, alright, I can also understand that "all beauty must die", and instead of 24... ¦d8 there is a stronger continuation, namely 24...¤c7! Die my foot – the beauty is just being born! After 25.Ґxe6 ¤xe6 26.¦d6 ¦ae8?! 27.¦g3! (27.Јh6 ¦g8!)Јf7 28.Јh6 another most curious position arises. Black has completely finished his development, parried the immediate threats and achieved a good enough blockade situation. And, in case you forgot, he is a knight up as before. But amazingly he has problems with his moves, a sort of some half-zugzwang! Here is a rough variation illustrating the probable nature of the struggle to follow: 28...a5 (28... ¦g8? 29.Јf6!) 29.Јf6+ Јxf6 30.exf6 ¦f7 31.¦e3 ¤c7 32.¦d7! ¦xe3 33.¦xf7 ¤e6 34.¦xb7, and in this complicated endgame the white chances are still better. All those unpleasant things have become possible because of Black's desire to keep blockading the e6-square at any cost, while he should have played more daringly and look for counterplay. The correct way to do this is 26... ¦ad8!, and after 27. Јh6 ¤ed4! (there is a threat of a check on e2) 28. Ґxd4 ¤xd4 29. ¦d1 we face this little wonder once again. Losing in an elementary way is 29...¤c6?? 30.¦d7ќ, but after 29...¦xd6? 30.exd6 White scores a success in an amazingly elegant variation: 30...¤e2+ (30...Јe3+ 31.ўb1 ¤e6 32.d7 ўg8 33.¦d3ќ. Stronger is 31...ўg8, but after 32.Јg5+ ўh8 33.Јe7! Black faces the difficult rook ending).31.ўd2! ¦d8 32.ўe1!! Јe8 33.ўf1!, and after the inescapable ¦d2 the knight is lost! Fantastic, isn't it? No less elegant variations ensue after 29...¤f3!? Why is it better than the retreat on с6? 30.¦d7? ¦xd7 31.¦xd7 ¦g8!! That's why: the rook escapes the attack with a tempo, on capture of the queen the mate along the 1st diagonal will follow as the f3-knight is in control of the d2-square! But White has his own arguments here: 30.¦6d3! (instead of the naive 30.¦d7?) ¦xd3 31.¦xd3. The knight is under attack, and after it retreats there will follow 32.¦d7, with a decisive effect already. But everything is not so simple – 31...¤g1!! 32.¦d7 ¦d8!! 33.¦xe7 ¤e2+ 34.ўb1 ¦d1+ 35.ўa2 ¤c1+, and Black gives a perpetual check! Now that's some knight! And still White can play for a win here if he doesn't take the queen but moves simply 33.¦xd8 Јxd8 34.c3. His queen is very active, his passed e-pawn is dangerous, and the heroic knight has obviously kind of lost itself in the enemy camp. In short, White's chances seem appreciably higher in this endgame to me. And still Black has at his disposal a clear-cut way to draw: 29...¤e2!+ 30.ўd2! (30.ўb1?! ¦g8) 30...¤d4! and White has nothing better than to begin repeating moves by way of 31.ўс1. A highly original mechanism! So after 18.Ґс3 Black faces serious but still surmountable problems. And it is easier to defend himself in this position still than to attack, I should say. Well, well, well, let us look for the alternative! 18.exd6!? From the positional point of view this move has both merits and demerits. On the one hand the powerful outpost on e5, that used to cramp Black's play extremely, vanishes, and his pieces break free. This applies particularly to the e8-knight – were the horse not wooden but live one, he would neigh with happiness... But from the other hand the long diagonal gets opened up for white dark-squared bishop and the e-file – for white rooks. What will prevail? Only concrete analysis can supply us with an answer. And so – let's go, with God's blessing! 18...¤xd6 (18...Јxd6 we can discard at once: 19.f5!, and neither 19...Јe7 20.Ґh6+ ўg8 21.Јg4+ ¤g7 22.Ґc4 nor 19...ўf8 20.fxe6 Ґxe6 21.¦he1 leave the slightest hope for Black). It is necessary for White to place his pieces on the firing positions as quickly as possible. But what to begin with - a bishop or a rook? Aye, there's the rub. Let's check out 19.Ґc3 for starters. It is easy to prove that white threats are very dangerous by making some "generally developing" move for Black, for example 19...Ґd7. 20.¦he1 ¤f7. Still worse is 20...Ґe8 21.Јg5+! ўf7 (21...Ґg6 22.f5 e5 23.Јg3) 22.Јh6 – there is a threat of both ¦e3-g3 and g4-g5, Black is absolutely helpless. 21.¦e3 e5. Forced! It takes only another "solid" move such as 21...¦ag8, and after tough 22.Ґe4!, aiming at the a6-knight, the advance e5 becomes impossible forevermore, and Black has no other adequate defense from the threat of 23.Јh4 and 24.¦g3. 22.fxe5 ¤fxe5™ (22...¤cxe5 23.¦g3+ ўf8 24.Ґb4ќ; 22...fxe5 23.Ґe4! ўf8 24.¦f1!ќ) 23.¦g3+ ўf8 24.¦f1!, and in no way can the catastrophe on the f6-square be prevented. 19...e5 does not help as well. Yes, Black intercepts the scary diagonal and the c8-bishop enters the game incidentally, but this slapdash built barricade looks much too flimsy... 20.fxe5 ¤xe5 (20...fxe5 21.¦hf1!, and the deadly transfer ¦f3-g3 is inescapable). 21.¦he1 ¤df7™ 22.¦e3 Јe6 (preparing the sovereign's evacuation via f8) 23.¦f1! Ґd7 24.¦g3+ ўf8 25.Јh4 ўe7 26.Ґb4+ ¤d6 27.Ґf5! It's all over. The exceptional power gained by every white piece really impresses. But Black has another opportunity at his disposal, namely 19...¤b5! This concrete move that at the same time is very much in the spirit of the position stresses the drawbacks of an early bishop's development to c3. Attacking the dark-squared bishop Black forces the exchange of the light-squared one – we can't seriously consider the retreat to d2, can we?! And this reduces the power of the white offensive drastically. And, for that matter, after 20.Ґxb5 axb5 Black unexpectedly obtains counterplay against the opponent's king – there is a threat of b5-b4! So White has to waste his time capturing the pawn: 21.Јxb5 (or 21.¦d3 ¦f8 22.Јxb5). In the ensuing position White already has two pawns for a piece and some positional compensation, but it seems to me that this is rather Black who can fight for a victory here. Thus for White it seems worthwhile to beat a retreat and confine himself to a perpetual check: 20.Јg5+ ўf7 21.Јh5+ As for Black he in his turn should hardly try to avoid a draw by way of 21...ўf8 22.Јh6+ Јg7 because after 23.Јxf6+ Јxf6 24.Ґxf6 he stands no better. OK, but why not start with 19.¦he1 reducing the game after 19...Ґd7 or 19...e5 to the variations that have just been investigated? That's as it may be, but then Black gets another opportunity: 19...Јf7!? In case of 19.Ґc3 this move would be impossible in view of 20.Јg5 with immediate win. But as for now the f6-pawn is not connected and Black can well drive the white queen back from its fine offensive position. However after a simple move 20.Јh4 White's position starts looking quite threateningly. No-one will naturally take me at my word nowadays, so there are the confirming variations for you: 1) 20...¤f5 21.Ґxf5 exf5 22.Ґc3, and Black has no satisfactory defense against rook's invasion to d6: 22...Ґe6 23.¦d6 ¦ae8 24.Јg5+!ќ. 2) 20...h6 In order to cover the g5-square in the variation 21.¦e3 ¤f5 22.Ґxf5 exf5 23.Ґc3 Ґe6 24.¦d6 ¦ae8. But this perfidy doesn't take Black very far, as White easily breaks through the enemy's clumsy fortifications by way of 25.g4! 3) 20...ўf8 21.Ґc3 ўe7 22.g4 ¦f8 23.g5! fxg5 24.fxg5! Јf4+™ 25.Јxf4 ¦xf4 26.Ґxh7, and it is obvious that the endgame is very dangerous for Black. 4) 20...¤e7 21.Јg3+ ўf8 (21...¤g6? 22.Ґb4 ¤b5 23.f5) 22.Ґb4 ¤e8 (22...¦g8 23.Јf3 ¤e8 24.Ґc4, and Black has literally nothing to move with) 23.Ґc4 b5 (23...a5 24.Ґc5 b6 25.Ґxb6 gives a short breathing space, but no more than this) 24.Ґxe6! Ґxe6 25.f5, and White literally sweeps the opponent off the board. So our long and winding road through the maze of variations arising after 16...d6 has come to an end. For those who are still reluctant to part with this fascinating position I will remark in brackets that besides the Q-side castling that has just been examined in detail, White can also reply on 16...d6 with a K-side one! The idea is to save a tempo while transferring the rook to g3, when the opportunity presents itself. But it is well known that you can't embrace the unembraceable, and so it's time to do summing up. And the conclusions are as follows: the idea of undermining the center does not solve Black's problems. There is no reason to condemn Christopher Lutz's decision! 17.g4?! Another crucial moment no less important than Black's 14th move. White accepts the opponent's silent proposal to play with the center closed. And I should say that this decision is in no way indisputable, especially if we keep in mind the results of our examining the consequences of the 16...d6 move. True, in case of straightforward 17.exd6 ¤xd6 18.Ґc3+ f6 19.O–O–O there arises on the board the position that we have already examined. As we remember Black manages to successfully overcome his difficulties by way of 19...¤b5!. But still White can try to play a bit more cunningly and not to hurry up with a check on c3 – 18.O–O–O! And if 18...f6 19.¦he1! or 18...Ґd7 19.Ґc3+ f6 20.¦he1!, then there are other positions from the preceding gigantic remark on the board, but this time, as we have already established, they are quite good for White. I personally can see the only opportunity for Black to redirect the play, and namely 18...¤b5 preventing the bishop from getting to c3. But the simple and natural move 19.f5! (on the vulgar 19.a4 there is a reply 19...¤bd4 20.Ґc3 e5!?) makes his situation critical again: 19...h6 (the only move) 20.f6+! Јxf6 21.¦hf1 Јe7 22.¦f3 ¤bd4! (the only chance again) 23.Ґxh6+! ¦xh6 24.¦g3+ ¦g6 25.Ґxg6 ¤e2+™ 26.Јxe2 fxg6 27.Јd3! Јe8™ (27...Јf6 28.¦f1ќ; 27...¤e5 28.Јc3ќ) 28.h4!, and the ten move forced variation leads us to the position that is absolutely won for White. And now we have every right to draw some conclusions. 1. White's intuitive sacrifice is absolutely correct. 2. At the same time Black after capturing on e7 on the move 14 kept chances for successful defense. The position was probably still within the limits of so-called "dynamic equilibrium". 3. The move 14...Јxe7 is a mistake. After this black position becomes very dangerous and by way of 17.exd6! White, in all probability, could have set before his opponent some hard-to-solve tasks. I only want to remind you that those conclusions have been drawn after hours-long computer-assisted work. Nevertheless the position is so complex that I'd rather not put too much trust in the silicone monster's recommendations. I can easily admit that my own conclusions can be contested as well. And it would be surely absurd to blame the co-authors of this splendid game for failing to calculate all those countless and most complicated variations during the game. Why, both GMs would surely not even think about wasting their precious time in such a way. The only way to play such positions in practice is "by the seat of one's pants". Well, well, well, and now let's follow the further developments. It will be interesting to see how much Motylev lost with his 17th move... 17...ўg8. Black chooses the most reliable defensive stand – ўg8 and ¤g7. It is reliable alright, but what would the h8-rook say apropos of this? I somehow would expect to hear no kindly words. But then, does Black have any adequate alternative? Let us examine a simple developing move 17...Ґd7. 18.O–O–O! The tempting 18.f5?! most probably would not work: 18...¤xe5 (The only move! Both 18...exf5 19.Ґh6+ ўg8 20.gxf5, and the black monarch cannot escape the point-blank fusillade along the now opened g-file, and 18...f6 19.g5!) 19.Јh6+ ўg8 20.Ґb4! Јh4+! 21.Јxh4 ¤f3+ 22.ўf2 ¤xh4 23.ўg3 ¤xf5+! (but not 23...¤g6? 24.fxg6 hxg6 25.Ґc3 with more than adequate compensation for a pawn) 24.gxf5 e5. White has to struggle for a draw. Black intends to fortify his strong center by way of f6 and Ґс6 and then to set about converting his advantage. And the showy 25.f6!? turns out a flop: 25...¤xf6! 26.¦hg1 h5! 27.ўh4+ ¤g4 28.h3 f5!, and Black's chances are surely better. 18...f6 And what else to do? Now the threat of 19.f5 is no joke. Black can retreat to g8 with his king, of course, but this will lead to positions from the game, and we are trying to find some alternative set-up for Black. It is interesting to compare this position with the one that we have discussed in the variation 16...d6 17.O–O–O f6 18.Ґc3 d5. In both cases everything pivots on the f4-f5 advance, but the difference in the positions of the dark-squared bishop and the d-pawn determines significantly different nature of struggle. 19.¦de1! White takes the e5-square under his control and renews the threat of 20.f5. The following forced variation proves that this threat is not idle: 19...¦c8? 20.f5! ¤xe5 21.¦xe5! fxe5 22.Ґg5 ¤f6!™ (22...Јf7? 23.Ґh6+ ўg8 24.Јg5+ ¤g7 25.f6ќ) 23.Ґh6+ ўg8 24.Јg5+ ўf7 25.Јg7+ ўe8 26.Јxh8+ ўf7 27.Јg7+ ўe8 28.g5 Јxg7 29.Ґxg7 ¤g4 30.fxe6 Ґxe6 31.Ґxh7 ўf7 32.Ґf6 ¤xf6 33.¦f1 ўg7 34.¦xf6, and White has excellent chances to win. And even the inclusion 19...Јf7 20.Јh4 by no means removes this threat from the agenda: 20...¦c8? 21.f5! h6 (21...¤xe5 22.¦xe5 fxe5 23.Јg5+ ўf8 24.fxe6 Ґxe6 25.Ґb4+ќ; 21...ўf8 22.Ґh6+ ўe7 23.exf6+ ўd8 24.Ґg7! ¦g8 25.fxe6 Ґxe6 26.¦xe6 Јxe6 27.f7+ќ) 22.fxe6 Ґxe6 23.exf6+ ¤xf6 (23...Јxf6 24.Јxf6+ ўxf6 25.¦hf1+ ўe7 26.¦xe6+ ўxe6 27.Ґf5+ќ) 24.g5 hxg5 (24...¤e4 25.gxh6+ ўf8 26.¦hf1ќ) 25.Јxg5+ ўf8 26.¦hf1 ўe7 27.Ґg6, with a rout. Desperate 20...f5? surely does not help as well: 21.gxf5 exf5 22.¦hg1+ ўf8 23.Јh6+ ўe7 24.e6! Ґxe6 25.¦xe6+ Јxe6 26.¦e1 Јxe1+ 27.Ґxe1, and the queen supported with two powerful bishops will make mincemeat of the black fortifications' remains. It follows that the only opportunity to hold the line is the prophylactic move 20...h6! taking the key h6 and g5-squares under his control in advance. Now the move 21.f5? is already impossible: 21...¤xe5 22.¦xe5 fxe5 23.Ґxh6+ ¦xh6 24.Јg5+ ¦g6! 25.fxg6 Јf4+, and Black wins. The thematic breakthrough needs preparing – 21.¦hf1! The threat is renewed as can be seen from the variation 21...¦c8? 22.f5! ¤xe5 23.¦xe5 fxe5 24.Ґxh6+! ¦xh6 25.Јg5+ ўf8 26.Јxh6+ ўe7™ 27.f6+ ¤xf6™ (27...ўd6 28.Ґg6ќ) 28.g5, and Black has had it. But Black's defensive resources are not exhausted at all; moreover, he has full two different in essence possibilities of defense. Let's have a look at them in succession. 1) First of all, Black can try to close the game – 21...f5!? Now when the pawn is already on h6 this move becomes possible. 22.gxf5 exf5 23.¦f3!? The idea of this move is to prevent the enemy sovereign from hiding on h7. (A straightforward swoop 23.¦g1+ ўh7 24.¦e3 is parried by way of 24...¦g8. And now on 23...ўh7 there will follow 24.¦h3, and 24...Јg6won't work due to 25.e6! Ґxe6 26.¦xe6 Јxe6 27.Ґxf5+ Јxf5 28.Јxh6+ ўg8 29.Јxh8+ ўf7 30.¦h7+ with crushing attack) So he has to escape to f8. On this here moment let's take rest, eat Twix... I mean take a closer look at the position that arises after 23...ўf8. The forced play is over. Black has achieved much by managing to seriously restrict the terrible enemy bishops. At the same time he keeps having lots of trouble with coordinating his pieces, first and foremost with making his h8-rook enter the game. All in all I wouldn't want to give any general assessment, but the way I see it the White's chances in the coming complicated struggle are, at the very least, no worse. This is an example of the possible developments: 24.¦g3 d4 25.¦eg1 Ґe6 (25...Јa2 26.ўd1 is of no use) 26.¦g6 ¦c8 27.Ґe1! A crucial moment! A key to success is activation of bishops. 27...b5 28.¦xh6 ¦xh6 29.Јxh6+ ўe7 30.Ґh4+ ўd7 31.Ґe2! Here the second bishop comes entering the play! 31...ўc7 (31...¤e7 32.Ґh5ќ) 32.¦g6!, and White wins. Of course, this variation smacks of "collaborationism" just a bit, I am sure that black play can be fortified, but still this is a fine illustration of the ideas contained in this position. 2) 21...ўg8. In order to prevent White from taking on h6 with a check after 22.f5? ¤xe5 23.¦xe5 fxe5. Now, contrary to the just examined continuation, the play remains open. The best move for White I can suggest is 22.exf6. What piece should take on f6? To capture with the knight is highly dangerous: 22...¤xf6 23.f5! e5 (There is no choice. On 23...exf5 both 24.Ґxf5 Јg7™ 25.Ґe6+! Ґxe6 26.¦xe6 ¤d7 27.Ґxh6, and 24.gxf5 ¦h7™ 25.¦g1+ ўh8 26.¦g6 ¦f8 27.Ґxh6 are strong; the opponent's defenses are breached anyway) 24.Ґxh6! e4 25.g5!, and white pawn avalanche should carry all before them. Thus the queen is one to do the taking: 22...Јxf6 23.Јg3 Јg7! (Carelessness is punishable: 23...¦c8?! 24.f5! exf5 25.gxf5+ ¤g7 26.¦g1 ўf8 27.Јf3, or 24...e5 25.g5 hxg5 26.Ґxg5 Јf7 27.Ґf6+! ¤g7 28.Ґxe5 ¤xe5 29.¦xe5 ¦h6 30.¦g1, and in both cases black position is extremely dangerous) 24.f5 The position remains utterly tense and complex. White obviously retains compensation, but it is hard to say how adequate it is. Here is a significant variation: 24...e5 25.h4! e4 (otherwise there follows a very unpleasant answer 26.g5) 26.f6!! ¤xf6 27.Јd6! with highly complex play in which White still keeps the initiative. For Black 24...exf5 25.Ґxf5 Ґxf5 26.¦xf5 ¤c7 27.Јd3! looks more reliable. Now there are threats both of 28.Ґf4 and of 28.g5, but by way of 27...Јd4! 28.Јg3 Јg7 Black can propose the move repetition. It doesn't seem wise for White to try and avoid it. Well, it's time to draw some conclusions. We have failed to disprove the idea of 17...Ґd7 and 18...f6. Nevertheless it is clear that White retains adequate compensation for his material losses. And from the point of view of practice the following aspect is very important: as we have seen the white initiative develops rather simply and naturally, while Black has to avoid numberless pitfalls on almost every move. So Grandmaster Lutz's choice on his move 17th was absolutely correct! But let us return to the events of the game at last. 18.O–O–O h6. The necessary constituent of a set-up intended by Black. After immediate 18...¤g7 white queen could have taken up the dangerous position on h6. 19.¦de1! Everything is logical and consistent. White prepares the thematic breakthrough f4-f5. We used to see this in different variations for many, many times... 19...Ґd7 20.Јh3. As it turns out, 20.f5? won't work for the time being in view of 20...¤g7 21.Јh3 exf5 22.gxf5 ¤xe5. And, come to think of it, the h5-square is no place for the queen anymore. 20...¤g7?! Here we have to slow down once again. I don't like this move at all. Is it not enough for Black to have this ill-starred rook on h8, that he drives his horse in such a stable? 20...f6!? simply stares in my face. We have just examined some very similar positions while considering the idea of 17...Ґd7 and 18...f6. But, as they say, there are nuances. And one of them lies in the fact that after 21.exf6 Јxf6 22.Јg3 Јg7! there arises a position almost identical to the one in the variation 17...Ґd7 18.O–O–O f6 19.¦de1 Јf7 20.Јh4 h6 21.¦hf1 ўg8 22.exf6 Јxf6 23.Јg3. Almost, but not completely! Black had won a tempo with Јf7-move, and white rook failed to get to f1 in time. Thus this position can be definitely considered favorable for Black. That's all very well, but the move Јg3 is not obligatory at all. Much stronger is 22.Јg2!, aiming at d5-pawn at once. However after 22...Јg7! (this is just the best square for the black queen) 23.f5 the position remains absolutely unclear. In the variations like 23...exf5 24.Јxd5+ Јf7 25.Јc5!; 23...¤c7 24.fxe6 Ґxe6 25.Ґf4 ¦e8 26.¦hf1!; 23...¤d8 24.¦hf1! White undoubtedly has an excellent "fighting" compensation. But after 23...¤e5! 24.Јe2! ¤xd3+ 25.Јxd3 ¦c8!! (much weaker are 25...¤c7 26.Ґc3 Јg5+ 27.ўb1 or 25...Ґb5 26.Јf3!) everything is much more complicated. If White carelessly plays 26.fxe6, then Black suddenly leaves his trenches and launches a counterattack: 26...Ґa4! 27.Ґc3 (27.c3 Јh7!) 27...d4! 28.Ґxd4 Ґxc2, and White has to fight for a draw in the endgame in which he is down a piece: 29.Ґxg7™ Ґxd3+ 30.Ґc3 ¦h7. And there is no time for prophylactic 26.ўb1: 26...d4! 27.fxe6 Ґa4! 28.b3 Ґb5, and Black once again obtains strong counterplay against the enemy king. There remains only 26.Ґc3, but on that move there follows 26...¦xc3 27.bxc3 ўf7!! The king escapes to the Q-side "under the bombing" and lets the h8-rook have a breath of air at last. Surprisingly everything goes just fine with Black! 28.fxe6+ (bad for White is 28.¦hf1 Ґb5! 29.Јe3 e5 30.¦f2 e4) 28...Ґxe6 29.¦hf1+ ўe7 30.Јxd5 (30.¦f5 ¤c7) 30...Јg5+. After 31.Јxg5+ hxg5 32.¦f5! ¦xh2 (32...¦g8?! 33.¦ee5!) 33.¦xg5 White surely runs no risk to lose, though. As well as to win, either. But that's not the half of it. We've got carried away a bit and missed one very important point – there is a possibility to take with the knight after f6 as well! White's trouble is that it won't do playing by analogy with the variation 17...Ґd7 18.O–O–O f6 19.¦de1 Јf7 20.Јh4 h6 21.¦hf1 ўg8 22.ef6 ¤хf6 now – there is no rook on f1, and the queen stands badly: 21...¤xf6 22.f5 e5! The only way! Losing is 22...Јd6 23.fxe6 Ґxe6 24.¦hf1 Ґd7 (24...¤e4? 25.Ґxe4 dxe4 26.¦f6! Јe5 27.¦ef1 ¦h7 28.¦g6+ ¦g7 29.¦xh6ќ) 25.Јh4! ¤xg4 (25...¤e4 26.¦xe4! dxe4 27.Ґc4+ Ґe6 28.¦f6ќ) 26.h3ќ. 23.Ґxh6 e4 24.g5 ¤e8! (24...¤h7? 25.¦xe4!), and White is forced to transpose into a difficult endgame: 25.¦xe4 Јxg5+! 26.Ґxg5 ¦xh3, as all the rest is still worse. Thus White seems unprepared for the concrete play as yet, so he has to grudgingly waste time on some kind of prophylactics like ўb1. But Black is not going to stand pat either, he will post his queen on g7 securely covering all his weaknesses. And, by the way, after this the route via f8-e7-d8, which the black monarch can use for escaping his besieged fortress on occasion, becomes free. I am absolutely far from drawing final conclusions. The position remains extremely complex and I probably miss some untapped white resources. But still in my humble opinion after 20...f6! Black could have fully counted on gradually neutralizing the opponent's initiative and on converting his significant material advantage later on. However all those possibilities are behind the scene now, and we will see quite a different picture in the game. 21.Јg2! Just the place to go! From g2 the "fianchettoed" queen casts an eye on both the g-file and the d5-pawn. Both will come real handy if White manages to carry out the f4-f5 breakthrough. 21...¦c8 22.ўb1! A necessary prophylactics. The time for decisive action has not come yet: 22.f5?? exf5 23.gxf5 ¤xe5° 22...f5 Well, well, well... We used to set out on a long journey through the maze of variations that begin exactly from this pawn advance three times already. And finally it has been carried out in reality! But the moment chosen by the German Grandmaster is not the best one, to put it mildly. It is hard to understand what the g7-knight is engaged in, but that's only half the trouble; it, on top of everything, deprives its own queen from the square that is ideal for it, as we have lately seen! Pure sabotage and wrecking if you ask me! And, joking aside, it is important to understand if Black had any choice or, having once taken a wrong path with the move 20...¤g7, he was already doomed to go downhill. Let's sort it out. First of all let us find out if there is a threat of 23.f5. A simple analysis shows that this threat is real! If White were to move in the position on the diagram he would play 23.f5! exf5 (losing outright is 23...f6 24.exf6 Јxf6 25.g5 hxg5 26.Ґxg5 Јf7 27.f6) 24.gxf5 ¤xe5 25.f6! (by no means should Black be permitted to fortify his position by way of f7-f6) Јxf6 26.¦hf1 Јd6 (26...Јe7 27.Јxd5ќ, 26...Јe6 27.¦g1ќ) 27.Ґb4 Јc7 (27...Јb8 28.Јxd5ќ) 28.Ґc3!, and Black is helpless. Now we can fully appreciate the strength of the White's 21st move – the queen on g2 does a great job both along the file and along the diagonal. Well, if there is a threat, then you have to defend yourself. But how? Let's size up variations. 1) 22...¤d4. Now 23.f5? is premature: 23...exf5 24.gxf5 Ґxf5 25.¦hg1 ¦h7. But the self-suggesting 23.Јf2!, driving the insolent knight away, dots the i's and crosses the t's:23...¤b5™ (23...Јc5 24.Ґe3; 23...¤c6 24.f5 ¤e8 25.f6 Јf8 26.g5 hxg5 27.h4! g4 28.Јf4ќ) 24.Ґb4! Јd8 25.f5, and there is no defense against f6 and g5 with impending mate. 2) 22...ўf8. The king escapes the most dangerous queen's X-ray attack, but, having got on the a3-f8 diagonal, finds out that he is out of the frying pan and into the fire. 23.f5! exf5 24.gxf5 Ґxf5 (24...¤xe5? 25.Ґb4; 24...¤xf5 25.e6!) 25.¦hg1 Ґg6 (25...f6 26.¦ef1) 26.e6! Јf6™ 27.¦ef1 ¤f5 28.exf7 ¤ce7 29.Ґb4!A picturesque position – Black is tied hand and foot.29...ўxf7™ 30.Ґxe7 ўxe7 31.Јxd5! (this move is much stronger than taking the bishop and transposing into an endgame)31...Јd6 32.Јxb7+ ¦c7 33.Јe4+ ўd8 34.¦d1, and it's time for Black to resign. Surely Black does not have to take on f5, he can withdraw his queen, but where to? On 23...Јd8 there follows24.f6 ¤e8 25.g5 hxg5 26.Јxg5, and the mate is not far off. А tragicomic position arising after 23...Јh4 24.f6 ¤e8 25.¦e3! Јg5 26.h4 (26...Јf4 27.¦e4!)Јg8, is really worth a diagram. I can see no other intelligent move for Black, and that means that it is not 22...f5 that is worth condemning, because this move is the best and, more than that, the only chance, but only and solely 20...¤g7. 23.exf6 Јxf6 24.h4?! Sasha overcomplicates things... It seems worth it (and how!) to charge with the bayonet – 24.f5! Yes, I know, "the threat is more terrible than its execution". Enough is as good as a feast. It was a remarkable moment to execute this particular threat. In the position shown on the diagram White threatens to take the king's fortress by storm: 25.g5 hxg5 26.Ґxg5 Јf7 27.f6. 24...exf5 25.gxf5 Ґxf5does not help: 26.¦hf1 ўh7 (there is nothing better than this) 27.¦xf5! ¤xf5 28.Јxd5 ¦cf8 29.¦e6 Јf7 30.Јe4!!, and there is no adequate defense against the threat of 31.¦xh6 ўg8 32.Јg4 ¤g7 33.Ґc4. And if Black refuses to take the f5-pawn, then White's pressure soon becomes unbearable, for example: 25...¤e7 26.¦hg1 ¦h7 27.Ґb4 ¤exf5 28.Јxd5+ Јf7 29.¦e5!, and White wins back a piece obtaining an absolutely won position. At first the prophylactic 24...Јf7 seems a good choice, as neither 25.¦hf1 e5 26.f6 ¤e6! 27.Јxd5 ¤f4! 28.Јxf7+ ўxf7 29.Ґxf4 exf4 30.¦xf4 nor 25.fxe6 Ґxe6 26.¦hf1 Јe7 promise White rosy skies. But the brilliant move 25.f6! still permits him to decoy the enemy queen back to f6 and to open up the g-file with a tempo: 25...Јxf6 (of course, 25...¤e8 26.g5 is no salvation either) 26.g5 hxg5 27.Ґxg5 Јd4 (27...Јf7 28.¦hf1 Јh5 29.Ґf6 Јf7 30.¦e3ќ) 28.Ґe3!, and White manages to reach the g7-square in all the variations: 28...Јf6 29.¦hf1 Јe7 30.Ґg5 Јd6 31.Ґf6 Јf8 32.¦e3ќ; 28...Јh4 29.¦hg1 ¦h7 30.Ґg5 Јxh2 31.Ґxh7+ Јxh7 32.Ґf6ќ; 28...Јe5 29.Ґc5 Јf6 30.¦ef1 Јh6 31.¦hg1 ¤e5 32.Ґe3ќ. The only move left is 24...e5! 25.g5! White has no right to procrastinate, if 25.h4, then 25...e4! But the variation 25.Јxd5+!? Јf7 26.Јg2 is quite acceptable; White keeps on attacking while having already two pawns for a piece. More than that, he has full compensation for his material losses even in the endgame arising after 26.Ґc4!? Јxd5 27.Ґxd5+. But, of course, there is no such thing as enough... 25...hxg5 26.Ґxg5. Where to retreat with the queen? Surely not to f7: 26...Јf7 27.f6 Ґh3 28.Јg1! (28.Јg3? ¤f5) 28...¤f5 29.Ґh6+! ўh7 30.Јg3! ўxh6 31.Јxh3+ Јh5 32.Јxh5+ ўxh5 33.Ґxf5, and Black has had it. Much more stubborn is 28...e4! 29.fxg7 ¦h7, but even so after 30.Ґe2 ¦xg7 31.Јe3 White's great advantage cannot be denied. The f7-square must remain at His Majesty's command – 26...Јd6!, and then after 27.f6 (of no use is 27.¦hg1 e4! 28.Ґxe4 dxe4 29.¦d1 Јxd1+! 30.¦xd1 Ґxf5 31.Ґf6 ¦c7, and Black surprisingly manages everything) 27...Ґh3, as opposed to the variation 26...Јf7, White should play exactly 28.Јg3! As for 28.Јg1?, it won't do while the queen stands on d6: 28...¤f5! 29.Ґh6+ (29.¦f1!? ¤cd4!) 29...ўf7, and Black after beating off the attack should win. 28...¤f5 29.Ґxf5 Ґxf5 30.¦ef1! Exactly so! Giving checks is pointless, the king will escape to e6. And why exactly that rook? In orderto include it along the now opened h-file in case of 30...¦h3 31.f7+! ўf8 32.¦xf5! ¦xg3 33.hxg3! How elegant! But in the variation 30...Ґg6 31.f7+ ўg7 32.¦hg1! as well White's victory is achieved just with help of the rook posted on h1 and not on e1. But still Black is not utterly doomed– 30...Ґxc2+! 31.ўxc2 ўf7! The forced play is over. The material equality is restored; there is a complex position on the board in which every opponent has his trumps. And still to my mind White can get an obvious advantage by precise and elegant 32.Ґh6! followed by the bishop's transfer to g7, for instance: 32...¤d4+ (32...¦hg8 33.Ґg7 ¤d4+ 34.ўb1 Јc7 35.¦hg1 Јc2+ 36.ўa1 ¤b3+ 37.ўa2) 33.ўb1 ¤e6 34.Ґg7 ¦h5 (34...¦hg8? 35.¦hg1ќ) 35.¦hg1 ¦g5 36.Јh3. Of course, to calculate all those highly complicated variations at the board is a task beyond even computer's strength. So Sasha's reluctance to force the events is quite understandable – what if something will go wrong, and, and the attack will "fly to a wind"? But now the struggle comes up with a bang again. In the position shown on the diagram 25.f5! is already a terrible threat as 25...e5 won't work now because of the elementary 26.g5.It is useless to try and hamper the breakthrough by way of 24...¤d4 – 25.f5! exf5 26.g5! hxg5 27.hxg5 Јd6 28.¦xh8+ ўxh8 29.g6 ўg8 30.Јh1! Јxg6 31.Јxd5+, and White wins back a piece retaining a great and most likely decisive advantage. But the ingratiating 24...Јf7!? is worth considerable attention. Now on 25.f5 Black joyfully plays 25...e5! And 26.f6, by analogy with the position in which the pawns have been posted on h2 and e6, is of no use here: 26...¤e6! (an awful blunder would be 26...Јxf6?? 27.g5 hxg5 28.hxg5 with irrefutable attack along the h and g-files) 27.Јxd5 (27.g5 e4!) 27...¤f4! 28.Јxf7+ ўxf7 29.Ґxf4 exf4 30.g5 f3!, and White faces a difficult struggle for a draw. And if he tries to avoid the exchange of the queens with the help of 28.Јe4, then Black has a tactical comeback at his disposal: 28...¤xd3 29.Јxd3 Јxf6! 30.Јxd7 ¦d8. Black pieces, that have been dejectedly crowding in their own camp for twenty moves, come to life and start playing, and how! Of course, White is not at all obliged to play 25.f5. He has another offensive plan connected with 25.h5 (but not immediately 25.g5? in view of 25...h5!). White intends to play 26.g5, to take on h6 and only then to advance the f-pawn. But in this case Black has his own convincing counter-arguments: 25...¤e7! Now on 26.g5 there will follow 26...¤ef5, and on 26.f5 – 26...exf5 27.g5 ¤e6. And I never doubt that in case of 26.Ґc3Black will gladly part with an exchange. In addition Black wouldn't mind to exchange the light-colored bishops by way of Ґd7-b5 if he got an occasion, or even to escape with his king to the Q-side along the 8th rank. I have absolutely no wish to imply that this is high time for White to resign - of course, it isn't so. He can always reckon on some compensation as long as Black fails to solve the problem of the h8-rook. For example, 26.Ґb4 permits him to keep the tension while waiting for the opportunity of breakthrough. But you know as well as I do that this is not exactly something to write home about... But still the German Grandmaster chooses an absolutely different strategy. Never mind hampering the f4-f5 breakthrough, he actually provokes it – but on his own terms! I can imagine how sick Christopher has been of "messing around" on two and a half ranks... 24...h5!? When we were young we all had been taught that it would do us no good to advance our pawns in the area where the opponent carried out his attack. But it is widely known that there are no rules without exceptions in chess. How to appraise this decision? Surely it is a courageous and gutsy one. As for objective estimate, it, as always, can be given only after a concrete analysis. So attention everybody! The fortress' gates fly suddenly open and the besieged army makes a sortie! 25.f5! It has happened at last! 25...hxg4 The only move. Opening up the g-file is suicidal: 25...exf5? 26.gxf5, and Black's position collapses about his ears like a house of cards. I won't give you the variations as we used to examine something like this more than once. There is no point in repeating ourselves. 26.Ґg5 26...Јd4! A very important point in the game! With this move Black presents his opponent with an opportunity to carry out f5-f6. Meanwhile after the restrained 26...Јf7 27.f6 is just plain weak: 27...¤h5 28.Јxg4 e5, and on any queen's retreat Black without any frills replies 29...ўf8, so after 29.Ґf5 Ґxf5 30.Јxf5 ¦e8 the attack gets bogged down as well. Still it is necessary to estimate the consequences of the continuation 27.fxe6 Ґxe6 (27...¤xe6?? 28.¦hf1 Јh5 29.Јxd5ќ) 28.¦hf1 Јd7 (collaborative 28...Јh5? 29.¦xe6 ¤xe6 30.Јxd5ќ deserves no attention). After the only move 29.¦f6! a most interesting position arises: White doesn't even have a pawn for a piece, but his rooks and bishops are extremely active. There is also a concrete threat: 30.¦fxe6 ¤xe6 31.Јxg4. I wouldn't want to give a final estimate, but White threats look quite dangerous to me. Here are some variations that are surely not exhaustive but still significant. 1) 29...¦f8? 30.¦exe6! (30. ¦fxe6? ¤xe6 31.Јxg4 ¤с5) ¤xe6 31.Ґf5! (31.Јxg4? ¤e5!) 31...¤cd4™ 32.¦g6+ ўf7 33.Јxg4ќ. 2) 29...¦e8 30.Ґg6! ¤d4™ 31.Ґxe8 Јxe8 32.Ґh6!(preventing the knight from getting to f3) 32...¦xh6 (I can see no better move) 33.¦xh6, and in this complex position with uncommon alignment of forces white chances still seem better. 3) 29...Ґf7 30.¦ef1 ¦f8! (30...Ґh5 31.Јf2 Јe8™ 32.Ґh6! ¤e5 33.Јd4!ќ; 30...Ґe6 31.Јf2 Јe8 32.Ґg6ќ; 30...¤e5 31.Ґf5! ¤xf5 32.¦1xf5 Ґg6 33.¦xe5 Ґxc2+ 34.ўa2±) Here White can force a draw if he wants it: 31.Ґh6 (with a threat of 32.Јd2) 31...¤e5!™ 32.Јd2 ¦e8!™ (32...¤xd3?? 33.Ґxg7ќ) 33.Јg5 ¦xh6 34.Јxh6 ¤xd3 35.¦xf7 Јxf7 36.¦xf7 ¦e1+ 37.ўa2 ¤c1+ 38.ўb1 ўxf7 39.Јd2, and Black has nothing more than a perpetual check. But White can put a fight as well: 31.Ґf5!? ¤xf5 32.¦1xf5 ¦h7™ 33.Јxg4 ¦g7 (33...ўh8?? 34.¦xc6ќ) 34.Јd1! (worse is 34.h5?! ¦e8!), and in this tangled position White retains full compensation for his sacrificed knight. 4) 29...¤d4!? That's what they call a pre-emptive blow! After this tough move the most curious complications arise: 30.¦g6! (30.c3? Ґf5!) 30...¦f8! 31.Јg3! (31.Ґf6? ¦xf6 32.¦xf6 Јe7 33.¦f4 Јxh4 34.Јg1!? ¤f3 35.¦xf3 gxf3 36.¦xe6 Јh1!µ) 31...Јf7! 32.Јe3! Just the move! 32.Ґf6? is surely weak: 32...Јxg6! 33.Ґxg6 ¦xf6. But why not 32.Јe5? Because after 32...Ґf5! 33.¦f6 ¤f3! the queen is under attack! And after the forced 34.¦xf7 ¤xe5 35.¦xf8+ ўxf8 36.¦xe5 Ґxd3 37.cxd3 g3 it is White who has to struggle for a draw. But now Black has nothing better than 32...Ґf5! 33.¦f6 ¤xc2! 34.Ґxc2 Ґxc2+ 35.ўxc2 Јc7+ 36.ўb1. Black has done all he could, but, alas, the notorious h8 rook is still out of play, and that means trouble. All in all Lutz was perfectly right! No picnic is in store for Black after 26...Јf7. So hats off to the German Grandmaster's intuition, as it is quite clear that both opponents had for long been pressed for time and real calculations were out of question. 27.f6!? Also worth attention is 27.fxe6, the more so because the position arising after 27...Ґxe6 28.¦hf1! is highly dangerous for Black; his "centralized" queen can in no way help the king. But, as opposed to the variation 26...Јf7 27.fxe6, here the capture on е6 is possible – the d5 and g4-pawns are defended. Now it becomes clear just why Lutz has retreated on d4! And after 27...¤xe6! 28.Ґf5! ¤f4! (probably the best chance) 29.Јxg4 Ґxf5 30.Јxf5 ¦f8 31.Јg4 ¤h5! White has to give a perpetual check on e6 and h6 or else! Being a natural born fighter, Grandmaster Motylev opts for more! 27...¤f5? That looks like a decisive mistake. After this move the black position is, in my opinion, lost. In case of 27...¤h5! the situation remains completely unclear. 28.f7+! In order to start converting his extra piece at last Black has only to play ўf7. But no dice! And now he has to answer a classic chess question: to take or not to take. Checkers players have a soft time of it; this is not their headache... Alright, let's check 28...ўf8 29.¦hf1 at first! It looks like Black is in for big trouble here: 1) 29...¤e5 30.Ґe3! Јa4™ 31.b3 Јc6 (31...Јxa3 32.Ґc1 Јd6 33.¦xe5! Јxe5 34.Ґa3+, and there is a mate in two moves) 32.Ґd4 ¤xd3 33.cxd3 e5™ (33...¦h7 34.Јxg4 ¤g7 35.Јg6 Јc2+ 36.ўa1ќ) 34.Ґxe5 ¦h7 35.Јd2! (The queen is transferred to g5) 35...¦xf7 36.Јg5, and White takes the knight, re-establishing the material equality without a pause in his attack. 2) 29...g3 30.Ґg6 (White intends to take on h5 and g3 creating a double threat of Ґh6 and Јd6) 30...Јg7 (30...Јg4 31.Ґxh5 ¦xh5 32.¦e3!) 31.Ґxh5 (31.Јxd5! is also very strong) 31...¦xh5 32.Јxg3 e5 33.Јb3!, and White should win. 3) 29...¤e7 30.Јd2! ¤f5™ (30...Јg7 31.Јb4ќ) 31.¦xf5! exf5 32.Јe2 ўg7™ (32...ўxf7 33.Јe7+ќ) 33.Јe7 ¦cf8™ 34.Јxd7 with a crushing attack. So the impudent pawn should be taken: 28...ўxf7 29.¦hf1+ ўg8 30.Ґg6 – with a terrible threat of 31.Ґхh5 and 32.¦f4. Now the evident 30...Ґe8 is losing, and amazingly elegant at that: 31.¦xe6 Ґxg6 32.¦xg6+ ўh7 33.Ґe3! (the beginning of a fantastic combination) 33...Јe4™ (33...Јxe3 34.Јxg4ќ) 34.¦g5!! "This is the end, my only friend, the end..." After 34...Јxg2 35.¦xh5+ ўg6 36.¦g5+ White mates with checks, and on 34...¤g7 the prosaic 35.¦f7 ¦hg8 36.Јf2 leads to a win. No, it is necessary to include the strongest piece in the defense – 30...Јg7! The queen will have to be given up, though... But that's the beauty of a material advantage - you can give something back in order to damp the offensive blaze. 31.Ґf7+ (31.Ґxh5 ¦xh5 32.¦f4 ¦xg5! 33.hxg5 ¤d4 promises White no moon) 31...Јxf7 32.¦xf7 ўxf7. Black has a rook and two knights for the queen. That's too much, so White has to do something about it in a hurry. And he has such an opportunity! 33.¦f1+ ўe8 34.c4! Clearing the center. Now white queen breaks out in the open. 34...dxc4 (there is nothing better than that) 35.Јe4 ¤e7 (the only move!) It the position shown on the diagram White is guaranteed a draw, for instance, by way of 36.Јd4 ¦h7 (36...¦g8 37.Јxg4) 37.Јe4 ¦h8 38.Јd4. But I cannot rule out that he can still play for win – all three white pieces are very active, and Black never managed to coordinate his forces. In this context Christopher's decision is quite understandable – he aims at intercepting the f-file as securely as possible. But this remedy appears to be worse than disease, and Alexander stresses this with his next move. Well, the intuition still let Lutz down at this moment... 28.¦d1! Јe5. If Black is to retreat with his queen, then this is the only square, otherwise after 29.Ґхf5 he would have to take with pawn, and then White hits on d5 with decisive effect. But still Black has an alternative: 28...¤d6!?, and the reflectory 29.Ґh7+?! gives nothing: 29...¦xh7 30.¦xd4 ¤xd4 31.Јxg4 e5 32.Јg2 ¤f7! Black has at last managed to coordinate his pieces and now his position is very strong. Well, yes, grabbing the queen is not at all obligatory. By way of 29.Ґe3! Јxf6™ 30.Јxg4+ White clears all the lines for his attacking pieces and should win. This is confirmed by concrete variations: 1) 30...ўf7 31.Ґg5 Јg7 32.Јf4+ ¤f5 33.Ґxf5 exf5 34.¦xd5 ўg8™ (34...Ґe6 35.¦xf5+ќ) 35.Јd6 ¦h7 36.Ґf6 Јg4 37.¦dd1!ќ. 2) 30...Јg7 31.Јf4!? (White provokes e6-e5 in order to weaken the important f5-square; however, 31.Јe2 ўf7 32.¦hg1 Јe5 33.Ґg6+ ўe7 34.Ґg5+ ўf8 35.Јg4 ¤f5 36.¦de1 Јg7 37.Ґxf5 exf5 38.Јf4 also wins) 31...e5™ 32.Јh2! ўf8 33.¦hg1 Јe7 34.¦df1+ ќ. All this is very well, but try to refuse winning the queen under time pressure! From practical point of view this chance is undoubtedly worth trying. And now white attack develops by itself. 29.Ґxf5! Naturally not 29.¦he1? Јg3. 29...Јxf5. Losing outright is 29...exf5 30.¦he1 Јd6 31.¦xd5 Јc7 32.Ґf4! Јd8 (or 32...Јxf4 33.¦xd7 Јc4 34.Јd2 with unavoidable mate) 33.f7+! ўxf7 34.¦ed1 (or 34.Јd2), and White wins the queen for the rook only. 30.¦hf1 Јg6. Of course, 30...Јh7 31.f7+ ўf8 32.Ґf6 does not save either. 31.f7+. 31...ўf8. Alas, Black has to let the wolf keep the sheep... I mean let the rook to f6. The endgame arising after 31...ўg7 32.Ґf6+ Јxf6 33.¦xf6 ўxf6 34.¦f1+ ўe7 35.Јxg4 is absolutely won for White due to two powerful passed pawns. And here are the confirming variations as usual: 1) 35...¦hf8 36.h5 e5 37.Јg5+ ўd6 38.¦f6+ ўc7 (38...Ґe6 39.Јh6ќ) 39.h6 d4 40.h7ќ. 2) 35...¦cf8 36.h5 e5 (36...¦h7 37.Јg5+ ўd6 38.Јg6ќ; 36...¦xf7 37.¦xf7+ ўxf7 38.Јg6+ ўf8 39.h6ќ) 37.Јg5+ ўd6 38.h6 Ґe6 39.Јg7 e4 40.Јxh8 ¦xh8 41.f8Ј+ ¦xf8 42.¦xf8 e3 43.ўc1ќ 32.¦f6 Јh7. The c2-pawn should be aimed at. After any other retreat white queen invades on d6 with decisive effect, for instance: 32...Јh5 33.Јg3 ўg7 (33...¤e7 34.Јd6ќ) 34.Јd6 ¤b8 35.¦df1 ¦cf8 (35...¦hf8 36.¦h6 Јxh6 37.Ґxh6+ ўxh6 38.Јf4+ќ) 36.¦h6! ¦xh6 37.Јxf8+ ўxf8 38.Ґe7+ ўg7 39.f8Ј+ ўh7 40.¦f7+ќ. Now on 33.Јg3?! Black intends to reply 33...¤e7 winning the most important tempo due to the threat of 34...Јxc2. 33.Јd2! A precise decision! To take the queen is surely weak: 33.Ґh6+? Јxh6 34.¦xh6 ¦xh6, and White cannot save the f7-pawn. And Ґh6 is now a threat, and inescapable one at that. 33...Јe4?! A typical time trouble move made in hope for pure fluke. Of course, there is no salvation, but more stubborn would be 33...ўg7 34.¦df1 Јh5 (if 34...¦cf8, then 35.¦6f2 with irrefutable threat of 36.Ґf6) 35.f8Ј+! ¦cxf8 36.Јf2! ¤e5! Now White can, of course, simply win an exchange: 37.¦xf8 ¤f3 38.¦xh8 ўxh8 39.Јg3. But much more convincing to my taste is 37.Јd4! ¦xf6 38.Ґxf6+, and wherever the king retreats, White obtains an easily won position: 38...ўh7 39.Ґxh8 ўxh8 40.¦e1 Јxh4 41.Јxe5+ ўg8 42.¦f1; 38...ўg8 39.Ґxe5 ¦h7 40.¦f4. And now everything is quite simple. I would have written "comment is superfluous" but... 34.Ґh6+ ўe7 35.Јg5 ўd6 36.f8Ј+ ¦cxf8 37.Ґxf8+ ўc7 38.Ґg7 ¦g8 39.¦f4?? Јh7?? Both flags were apparently on the point of falling. Of course, White wins at lib, the simplest way being 39.¦g6. But under great time pressure Alexander blunders away, and Christopher misses his miraculously turned up chance. After 39...¦xg7! 40.Јxg7 (naturally, 40.¦:e4?? ¦xg5 41.hxg5 dxe4 42.g6 ¤e7 is bad) 40...Ј:f4 41.h5 ¤d8 42.h6 ¤f7 43.h7 White still has an extra exchange, but he can hardly count on a win in earnest. Was the game spoiled by this mutual time pressure blunders? Not in the least, if you ask me. Polish satirist H. Jagodzinski once remarked: "There are people who never make mistakes. They are those for whom others think". In present-day chess this phrase becomes more and more actual, alas. Computers (and unscrupulous cheaters) keep their eyes open. But I dare you to show me a prog that is capable of playing 10. ¤:g7! 40.¦xg4 ўc8 41.h5 e5 42.Јg6. Black resigned. What a grand battle! I would like to wind up with the following: it would not be right to accept my estimates and conclusions uncritically. I am not as conceited as to think that I have managed to discover the richest inner content behind those forty odd moves quite adequately. The task I have set to myself is quite different – to help the site visitors to the extent of my humble abilities to enjoy the beauty and harmony of our Royal Game, to feel its mysterious charms that are superior both to time and progress. I do hope I managed.


ALL ARTICLES BY AUTHOR
| THE EXPERT`S CHOICE: E.GLEIZEROV COMMENTS ON THE GAME MOTYLEV-LUTZ |
| THE EXPERT`S CHOICE: EVGENY GLEIZEROV COMMENTS |
| Grandmaster Gleizerov annotates |
Discuss in forum